Video editing
Trim the start and end of a video to choose the part to keep, apply light · color · LUTs · effects just as you would to a photo, add background music and a fade at the start and end, then export it as a new MP4 file. You can also change the aspect ratio or straighten a tilt, and save any scene you like as an image. The original video file is never changed. Video editing is available in the Windows version.
On this page
When to use itHow to open itThe screen at a glance③ Playback bar④ Timeline — trimming the start and end⑥ Right panelFrame capture — saving a scene as an imageExportStep by stepResultGood to knowFrequently asked questionsRelated topicsWhen to use it
- When you want to keep only the part you need from a long video to send by messaging app or post on social media — the handles on the timeline.
- When footage shot in log (C-Log · S-Log) looks washed out and flat and you want normal colors back — Log → Rec.709 on the LUT tab.
- When you want to lay background music under a travel video and open and close it with a soft fade from black — the Sound · Effects tabs.
- When you want to turn a landscape video into a vertical (9:16) short or a square — the Crop tab.
- When you want to save a scene from a video like a photo — frame capture.
How to open it
- In the gallery, double-click a video to open it in Full view.
- Click Edit at the top right. The video editing screen opens, with Viewer › Video editing shown at the top.

- If editing isn't available for your setup or the file's format, External editor appears in this spot instead; click it to open the video in another program.
- Edits are saved separately for each video. When you open the same video again, your last edits are still there.
The screen at a glance
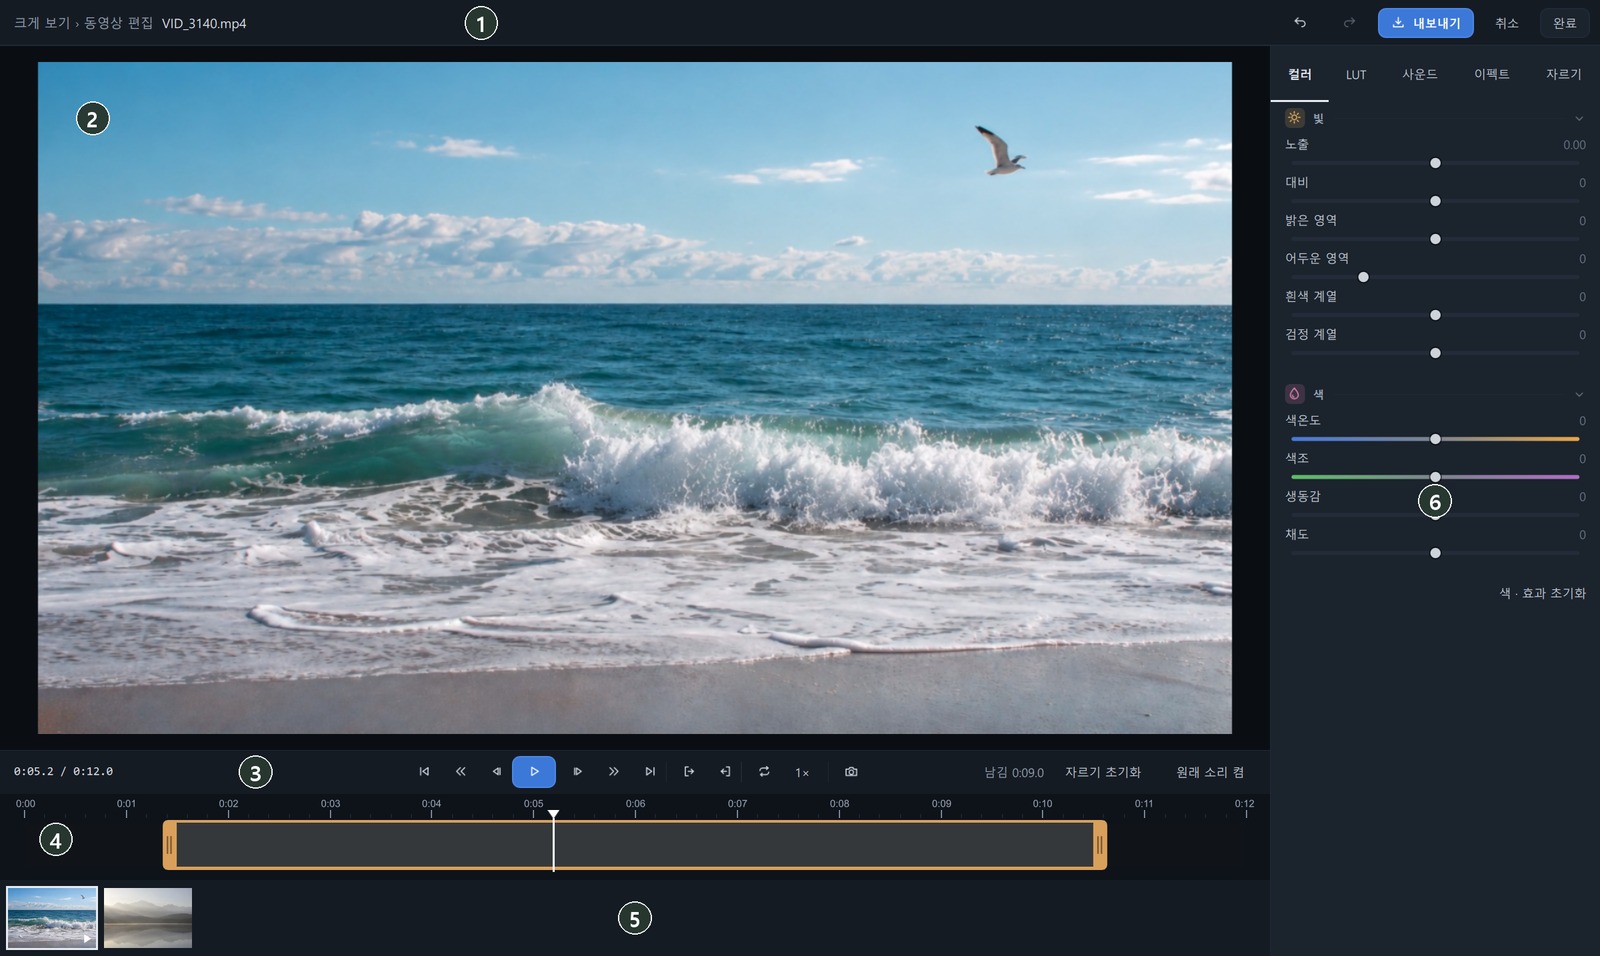
| No. | Name | What it does |
|---|---|---|
| ① | Top bar | File name · Undo · Redo · Export · Cancel · Done |
| ② | Preview | Plays the video with your edits. Click it to play · pause |
| ③ | Playback bar | Current time / total length, playback controls, kept length, original sound on · off |
| ④ | Timeline | The time ruler and the video bar. Use the handles at both ends to choose the part to keep |
| ⑤ | Photo strip | The other files in the same list. Click a video to open it here instead; click a photo to go to the photo editor |
| ⑥ | Right panel | The Color · LUT · Sound · Effects · Crop tabs |
- Done (Esc) saves your edits and returns to Full view. Cancel discards the changes made this time and closes.
- While exporting, you can't click Cancel · Done. Close once it's finished.
③ Playback bar

| No. | Name | Key | What it does |
|---|---|---|---|
| ① | Go to start | Home | Goes to the start of the part you're keeping. |
| ② · ⑥ | Back 5 s · Forward 5 s | Shift+← · Shift+→ | Moves 5 seconds at a time. |
| ③ · ⑤ | Previous frame · Next frame | ← · → | Moves one frame at a time. Use it to pick exactly where to trim. |
| ④ | Play / pause | Space | Plays and pauses. You can also click the preview. |
| ⑦ | Go to end | End | Goes to the end of the part you're keeping. |
| ⑧ | Set start here · Set end here | I · O | Sets the spot you're viewing as the start · end of the part to keep. |
| ⑨ | Loop range | L | When on, plays the part you're keeping over and over. |
| ⑩ | Playback speed | — | Each click switches through 0.25× · 0.5× · 1× · 1.5× · 2× in turn (preview only; the exported file keeps its speed). |
| ⑪ | Save this frame as an image | C | Saves the current scene as a JPG, with your edits exactly as shown (see "Frame capture" below). |
| ⑫ | Keep · Reset trim · Original sound on | — | Shows the length of the part you're keeping (e.g. Keep 0:12.4). Reset trim removes the start and end trim. The button on the right turns the original sound on and off. |
④ Timeline — trimming the start and end

- Drag the ② start handle and the ③ end handle left or right. While you drag, the preview shows the scene at that spot.
- The part outside the handles (⑤) is dimmed and is left out when you export.
- Click or drag an empty spot on the timeline to move the ④ playhead there.
- Playback stops at the end of the part you're keeping (just like the exported file). With Loop range on, it plays again from the start.
⑥ Right panel
Color
Light: Exposure · Contrast · Highlights · Shadows · Whites · Blacks / Color: Temperature · Tint · Vibrance · Saturation. The sliders are the same as in photo editing (Light · Color). Reset color · effects at the bottom sets the Color · LUT · Effects values back to where they started.

LUT
Applies a look (LUT) to the video. Each LUT shows an image of how it looks on the current scene.

| Group | What's in it | When to use it |
|---|---|---|
| Log → Rec.709 | Log conversions for the camera and recording setting | To bring footage shot in log back to normal colors. Choose the one that matches your camera and the settings you shot with. |
| Looks | Teal & Orange · Cinematic Warm · Cinematic Cool · Film Fade · Bleach Bypass · B&W High Contrast · B&W Soft · Warm Portrait · Night Blue · Golden Hour · Emerald Film | To change the mood. |
| My LUTs | The .cube files in your LUT folder | The same LUT collection as in photo editing (Color — Look (LUT)). |
My LUTs appears when you have added .cube files. This image shows the built-in collection.
- ① Strength — 0 – 100%, default 100%. Appears once you choose a LUT.
- ⑤ Refresh previews — After moving to a different scene, click it to remake the LUT images from the current scene.
Sound
Turn the original sound on or off, change its level, and add background music. The sound as you set it goes into the exported video.

| No. | Name | Range | Default | What it does |
|---|---|---|---|---|
| ① | Original sound on · Original sound off | On · Off | On | Sets whether to include the sound recorded with the video. |
| ② | Volume | 0 – 200% | 100% | The level of the original sound. |
| ③ | Background music · Remove | — | No music | The name of the chosen music appears with a ♪. Use Remove to take the music out. |
| ④ | Built-in music · My file… | 8 tracks · file | — | Click one of the 8 tracks included with the app, or choose an mp3 · m4a · aac · wav file with My file…. |
| ⑤ | Music volume | 0 – 200% | 100% | The level of the background music. Adjust it while listening to the mix with the original sound. |
| ⑤ | Starts at | 0 s – | 0 s | Sets how many seconds into the resulting video the music starts. |
| ⑤ | Skip music intro | 0 s – | 0 s | Sets how many seconds of the start of the music file (an intro and so on) to skip before playing. |
| ⑤ | Music fade in · Music fade out | 0 – 5 s | 0 s | Makes the music gradually get louder at the start and gradually quieter at the end. |
| ⑥ | Loop if shorter than the video | On · Off | — | If the music is shorter than the video, it plays again from the start. If the music is longer, it's cut off at the end of the video. |
- When you play the preview, the music plays along too, in step with the video.
- If you move or delete the chosen music file, "The chosen music file can't be found." appears. Choose it again.
Effects

| No. | Name | Range | What it does |
|---|---|---|---|
| ① | Vignette · Grain · Black & white | −100 – 100 · 0 – 100 · on/off | Darkens (or brightens) the edges, adds film grain, and turns the video black and white. |
| ② | Start (from black) · End (to black) | 0 – 3 s | The video gradually appears from black, and fades to black at the end. The original sound also gradually gets louder and quieter along with it. |
| ③ | Film looks | 13 looks · Reset | The same names and the same colors as the photo presets: Film · Warm Film · Instant Film · '90s Color · Vintage · Cinematic · Cinematic Warm · Cinematic Cool · Cinematic Fade · Teal & Orange · Black & White · Noir · Sepia. Reset sets color · effects back to where they started. |
Crop
Change the aspect ratio, rotate by 90°, and straighten tilt and perspective. While this tab is open, a crop frame appears over the preview. Drag the frame to change its size and position.
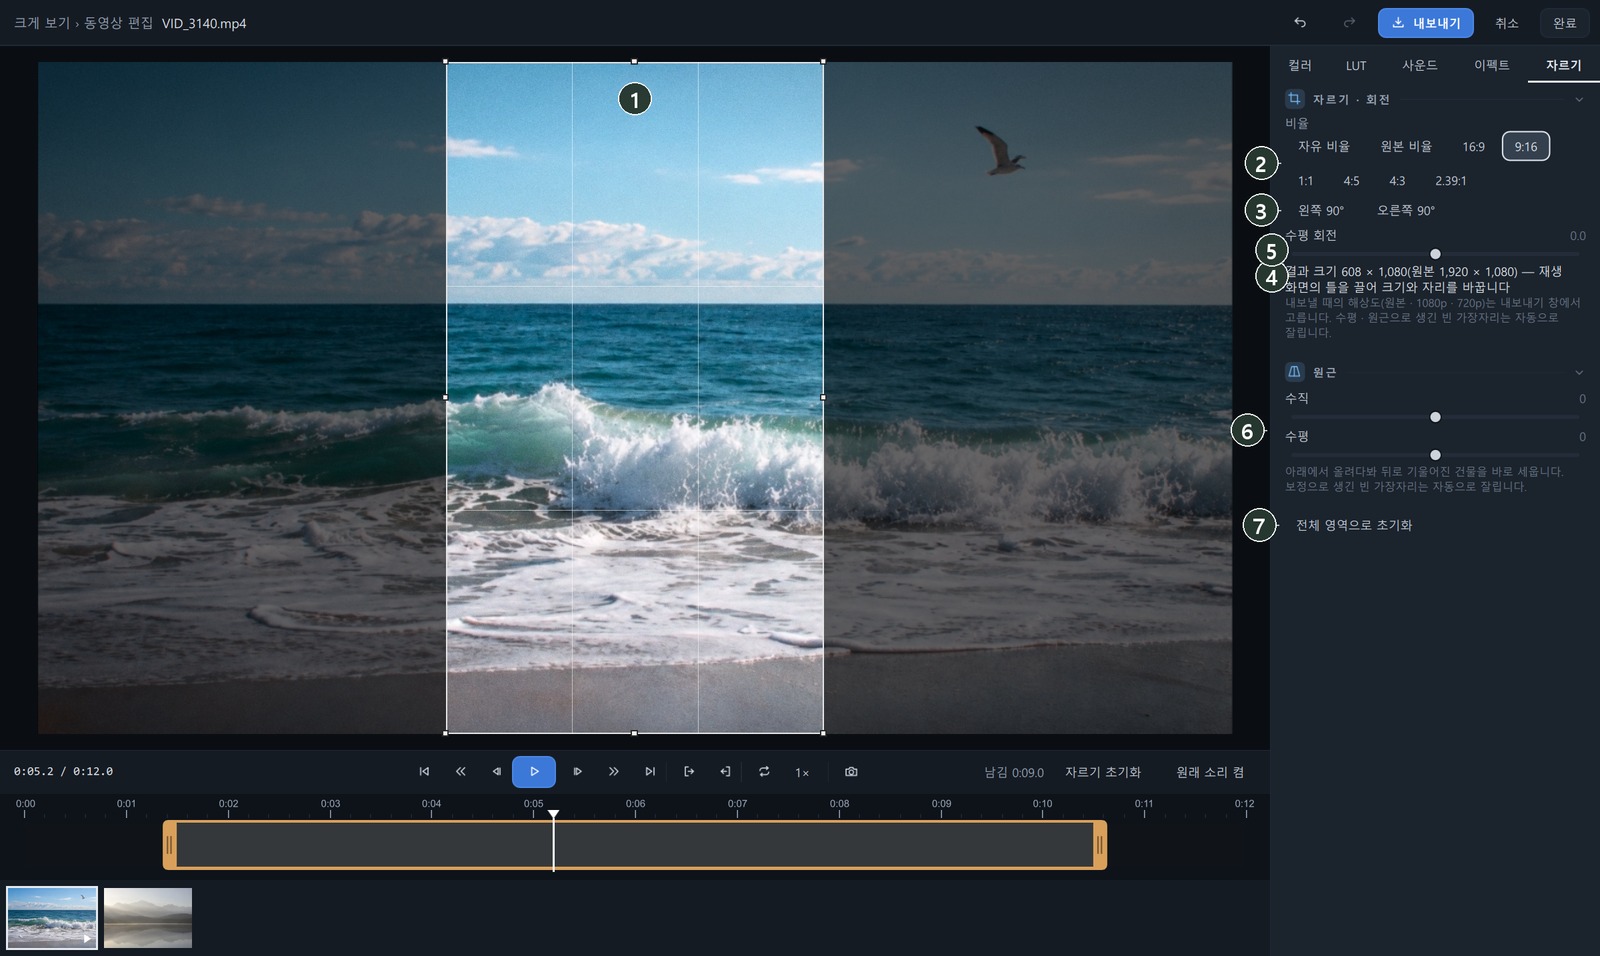
| No. | Name | Options · Range | What it does |
|---|---|---|---|
| ② | Ratio | Free · Original · 16:9 · 9:16 · 1:1 · 4:5 · 4:3 · 2.39:1 | Locks the width : height ratio of the frame. For vertical shorts, use 9:16. |
| ③ | Left 90° · Right 90° | Click | Rotates the video 90° at a time. |
| ④ | Straighten | −45° – 45° | Straightens a tilted horizon. |
| ⑤ | Result size | Display only | e.g. Result 1080 × 1920 (original 3840 × 2160). |
| ⑥ | Vertical · Horizontal (perspective) | −100 – 100 | Straightens shapes that lean, such as a building shot from below (same as Crop · Perspective). |
| ⑦ | Reset to full frame | Click | Sets crop · rotation · perspective back to where they started. |
- Empty edges left by straightening or perspective are cropped automatically.
- Choose the export resolution (original · 1080p · 720p) in the Export window.
Frame capture — saving a scene as an image
- Pause on the scene you want to save (use ← · → to adjust one frame at a time).
- Click the capture button on the playback bar, or press C.
- The first time, you're asked for a folder to save to. The folder you choose is remembered; you can change or clear it with Video capture folder in Settings.
- The scene, with your current edits (Color · LUT · Effects · Crop) applied, is saved as a JPG at the original resolution, and "Capture saved: …" appears in the status bar.
Export
- Click Export in the top bar to open the Export video window.

- Choose the ② size — Original · 1080p · 720p.
- Click ③ Save and choose the name and folder to save to. If a file with the same name exists, you're asked to choose a different name (it never overwrites).
- The progress window shows the progress, frame count, elapsed time and time left. If you Cancel, no file is left behind.
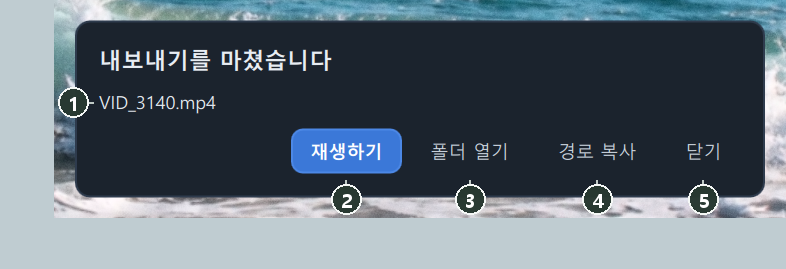
- When it's done, "Export finished" appears along with ② Play · ③ Show in folder · ④ Copy path. You can also click the path to play it.
- The result is a new MP4 (H.264 · AAC) file. The original stays as it is.
- Start and end trim · Color · LUT · sound · background music · fades · Effects · Crop are all included.
- You can also edit and export 10-bit 4:2:2 HEVC footage shot on a mirrorless camera.
Step by step
Turning a travel video into a 30-second short
- Open the video in Full view and click Edit.
- Choose the part to keep
Drag the start and end handles on the timeline until "Keep" on the playback bar reads around 0:30.0.
- Choose 9:16 on the Crop tab
Drag the frame in the preview so your subject is in the middle.
- On the Effects tab, click Cinematic Warm under Film looks.
- On the Sound tab, choose one of the built-in tracks and set Music fade out to 2 seconds.
- Set End (to black) on the Effects tab to 1 second.
- Export → 1080p → Save
When it's done, check it with Play.
Refine the colors of a video
- Open the LUT tab.
- Choose a look under Looks and adjust its strength.
- Make small changes to exposure, contrast and color in Color.
Result
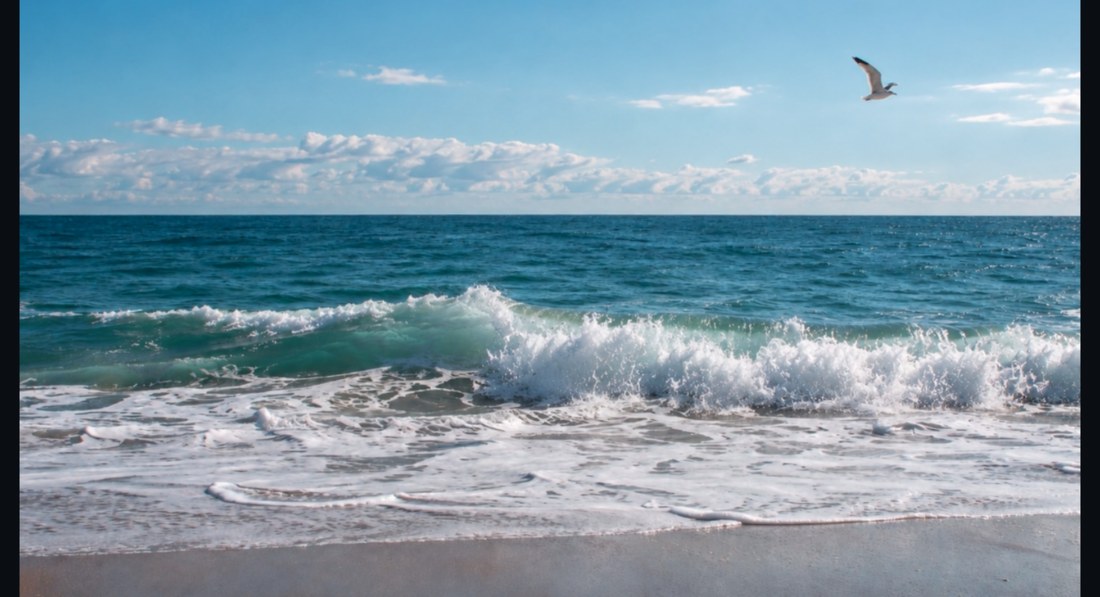
 BeforeAfter
The exported MP4 appears in the gallery as a new video. The original video and its edits stay as they are, so you can export again with different settings.
Good to know
Video editing doesn't change the original. It's different from features that change the file itself, such as rotating with Apply in Full view (Video).
To pick exactly where to trim, move one frame at a time with ← · →, then press I · O.
In the free version, exporting a video whose Color · LUT · Effects · Crop were changed adds a faint watermark. Videos where you only changed the start and end trim · sound · music · fades don't get one (Free version · Full version).
Check the copyright before using music you chose with My file. The built-in music included with the app can be used for slideshows and video editing, including in the videos you export. The music alone can't be separated out and redistributed or sold.
The playback speed button applies only to the preview. The exported video plays at its original speed.
Frequently asked questions
I see External editor instead of Edit.
Video editing is available in the Windows version. Elsewhere, use External editor to open the video in another program.
Exporting takes a long time.
The higher the resolution, the longer it takes. Check the time left in the progress window, and if you need it quickly, export at 1080p or 720p.
The exported video has no sound.
On the Sound tab, check that it's set to Original sound on and that Volume isn't 0.
Where are my captured images?
In the folder shown under Video capture folder in Settings — the folder you chose the first time you captured.
Can I put a frame or cover on a video?
No. Frames and covers can be applied only to photos.