Frames · Magazine covers · Watermarks
Put a frame with your camera details around an edited photo, or style the photo like a magazine cover. The decoration you choose is saved with that photo, so it shows up as it is in thumbnails, in Full view and in exported files. Watermarks that add your own logo or name are covered here too. The original file is never changed.
On this page
When to use itWhere to find itThe Frame screen at a glanceFramesMagazine coversWhere it's saved and where it showsWatermarksStep by stepResultGood to knowFrequently asked questionsRelated topicsWhen to use it
- When you want to neatly add shooting details such as camera · lens · aperture · shutter under a photo for social media — Info bar in Frame.
- When you need to post a landscape photo at a 1:1 · 4:5 · 9:16 ratio but don't want to crop it — the frame's ratio (filled with margin).
- When you want to write a line of text in the bottom margin, like an instant photo — Instant.
- When you want to style a portrait like a magazine cover with a big headline — Magazine cover.
- When you want to add your own logo or name to every photo you export — Watermark.
Where to find it

Frames and covers are chosen in the Frame screen. You can open it from three places.
- Frame in the editor's top bar (between Reset all and Showcase).
- Frame in the tools at the top right of Full view. If the photo is already decorated, the button looks switched on.
- The Frame button on the Frame row of the Export window.
Watermarks are set up with Watermark in the editor's top bar (right after Auto).
Frames and covers can't be applied to videos.
The Frame screen at a glance

| No. | Name | What it does |
|---|---|---|
| ① | None · Frame · Magazine cover | Chooses the kind of decoration. None means the photo isn't decorated. |
| ② | Style picker | Shows ready-made designs as images drawn from the current photo. Click one to switch to that style. |
| ③ | Large preview | Looks exactly as it will when exported. While you make changes, Drawing… appears briefly. |
| ④ | Output size | The size of the resulting file with the decoration added (e.g. Output 2048 × 2560). |
| ⑤ | Detailed settings | Shows the settings for the kind you chose (see the tables below). |
| ⑥ | Cancel · Done | Click Done to save it to this photo. Cancel leaves it unchanged. |
If you opened it from Full view, there's an Edit photo button at the top that takes you straight to that photo's editor.
Frames
Choose one of 6 ready-made styles — White bar · Black bar · Cream classic · Gallery · Instant · Black border — then fine-tune it below.

| No. | Name | Options | What it does |
|---|---|---|---|
| ① | Style | Info bar · Gallery · Instant · Border only | Info bar puts the shooting details in a bar under the photo, Gallery adds a mat with wide margins, Instant gives the look of an instant photo with a wider bottom, and Border only adds a thin border. |
| ② | Ratio | Original · 1:1 · 4:5 · 9:16 | The width : height ratio of the result. The photo is never cropped; the margin fills the rest. |
| ③ | Margin color | White · Cream · Black · Charcoal · Photo color | The color of the margin and the bar. Photo color fills it with a color picked from the photo. |
| ④ | Font · Text color | Font: Default · Condensed · Classic / Text color: Auto · Black · White · Gray · Gold | The look and color of the text in the frame. Auto picks a color that's easy to read on the margin color. |
| ⑤ | Add the photoKam logo | Logo + name · Logo only / Logo color | When on, puts the photoKam logo in the margin. |
| ⑥ | Details — taken from the photo's EXIF | Camera · Lens · Focal length · Aperture · Shutter · Date | Reads the checked items from the photo's shooting details and adds them. Anything the photo doesn't have is left blank. |
| ⑦ | Text | Text field · Put my watermark in the frame | For Instant, it's the caption under the photo (e.g. Autumn by the river); for the other styles, it's a signature (e.g. © Your Name). Turn on the checkbox below it to put your watermark where the signature goes (see "Watermarks" below). |
Magazine covers
Choose one of 10 cover styles — Fashion · Monochrome · Retro · Minimal · Street · Beauty · Lifestyle · Cinema · Pop · Travel. Scroll the style row sideways to see them all.
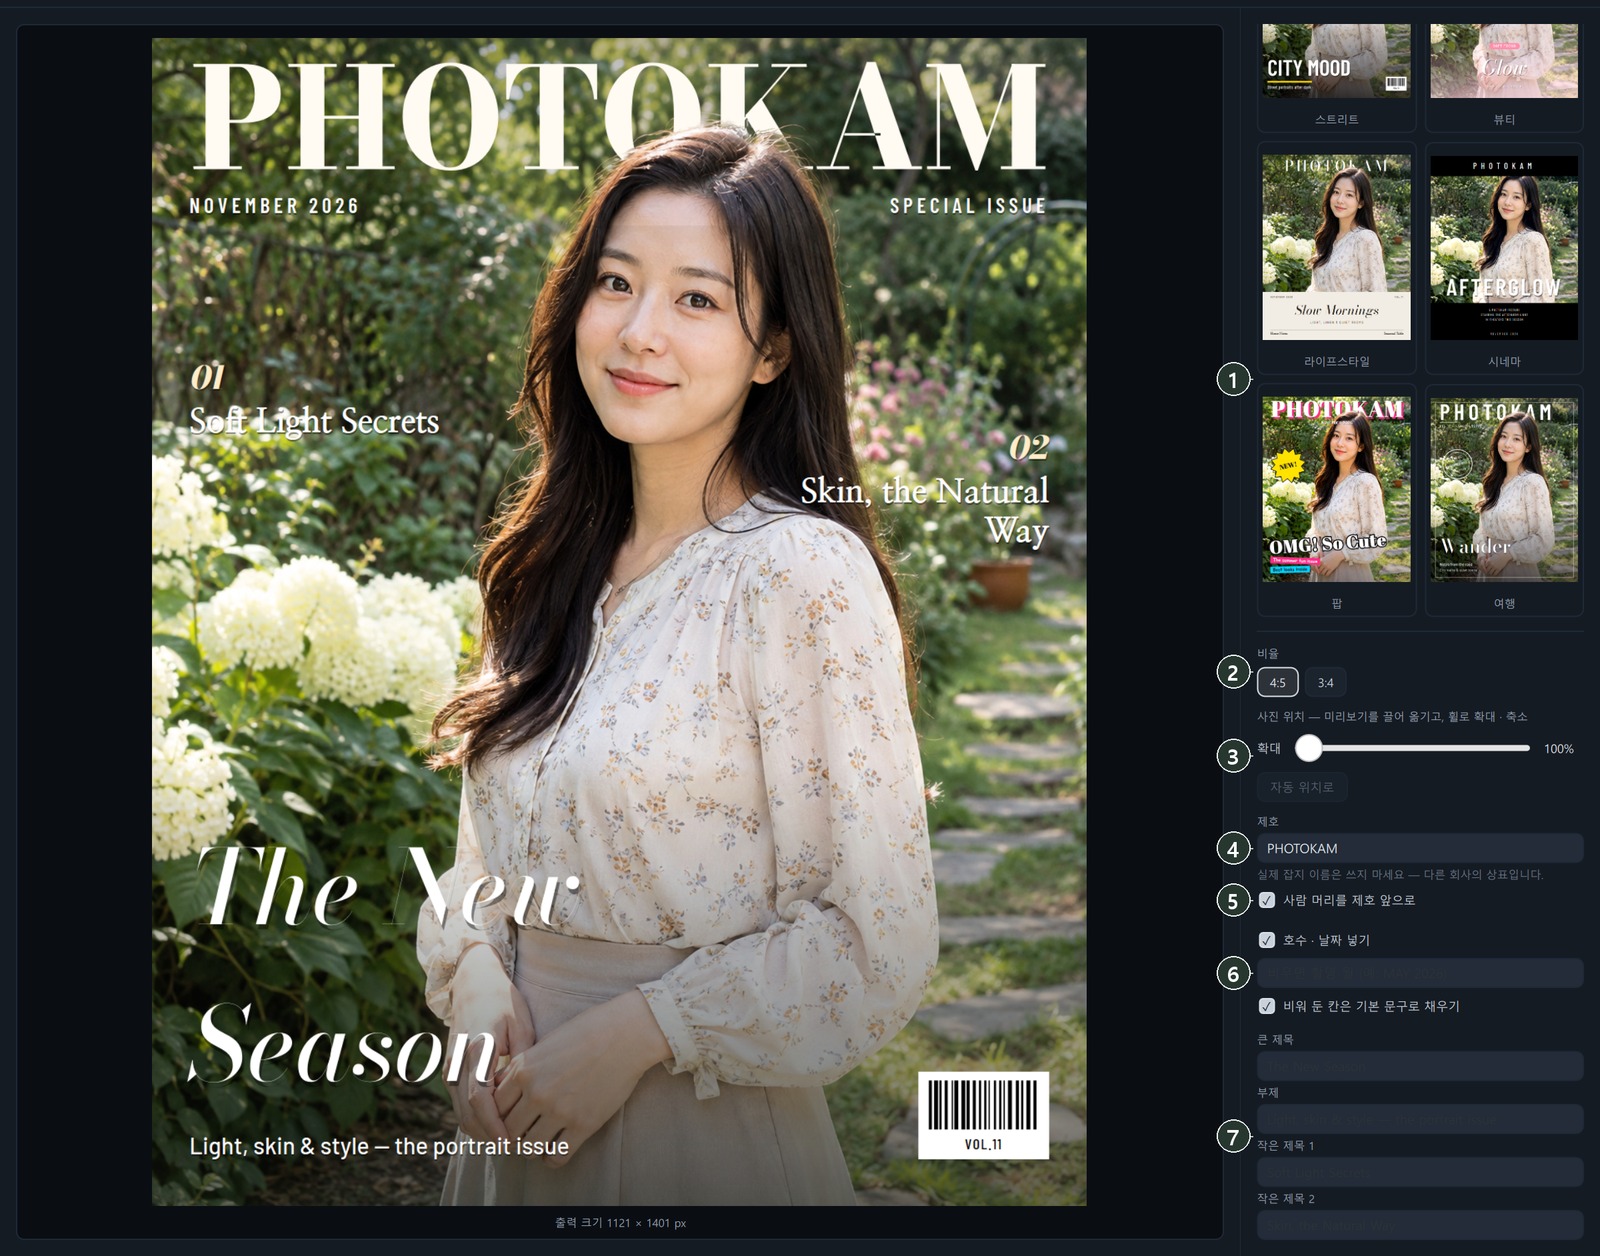
| No. | Name | Options | What it does |
|---|---|---|---|
| ① | Cover style | 10 styles | Changes the position and font of the masthead and headlines, along with the color feel of the photo. |
| ② | Ratio | 4:5 · 3:4 | The width : height ratio of the cover. |
| ③ | Photo position · Zoom | Drag the preview · wheel · slider (100 – 300%) · Auto position | Drag the photo in the preview to move it, and zoom with the wheel or the slider. The text stays in place and only the photo moves. Auto position puts it back where it started. |
| ④ | Masthead | Text field (default PHOTOKAM) | The big name at the very top of the cover. Don't use a real magazine's name — it's someone else's trademark. |
| ⑤ | Bring the head in front of the masthead | On · Off | Places the head of the person in the photo in front, so it slightly covers the masthead letters. Retro keeps the masthead in front. |
| ⑥ | Show issue line | On · Off · text field | If left empty, the month the photo was taken is used (e.g. MAY 2026). |
| ⑦ | Headline · Subheading · Cover line 1 · Cover line 2 | Text fields | The text on the cover. With Fill empty fields with sample text on, empty fields get sample text that suits the style. |
Where it's saved and where it shows
- When you click Done, the decoration is saved as part of that photo's edits. The original file stays as it is.
- Gallery thumbnails and Full view show the decorated look too (in the grid it's scaled down so nothing gets cut off).
- To make editing easier, the editor shows only the photo, with a Frame · cover badge at the top left. Click the badge to open the Frame screen.
- Export includes the photo's decoration as it is. To leave it out just this once, turn on Export without frame or cover in the Export window.
- Choose the Frame · cover group in the Copy edits · Paste window to apply the same decoration to other photos too (Editor overview).
Watermarks
Adds your own logo or text to the photos you export. Click Watermark in the editor's top bar to open the settings panel on the right. When the chosen watermark is set to be added on export, a green dot appears on the button.

| No. | Name | What it does |
|---|---|---|
| ① | SAVED WATERMARKS | The list of watermarks you've made. Click one to choose it. Manage them with Duplicate · Delete. |
| ② | New watermark — Logo · Text | Creates a new watermark from a logo image or from text. For a logo, choose a PNG · SVG file or drag it onto the panel. A PNG with a transparent background, or an SVG, looks cleanest. |
| ③ | Watermark text · Font · Bold · Italic · Logo color · Text color · Spacing | Sets the text and its look, and the logo color (Original · White · Black · Custom). |
| ④ | Effect | None · Shadow · Soft shadow · Glow · Outline — keeps the watermark easy to see even on bright or busy backgrounds. |
| ⑤ | Position · Size · Opacity · Margin | Drag the watermark on the photo to move it, and drag its bottom-right corner to resize it. You can also set these with the sliders. |
| ⑥ | Preview on photo · Add on export | Sets whether to preview it in the editor and whether to add it on export. |
- On the Watermark row of the Export window, choose the watermark to add this time, or choose None. Click Settings… to open this panel.
- If you turn on Put my watermark in the frame in a frame, the watermark goes in the signature spot in the frame's margin instead of on the photo.
- In the free version, the watermark appears only as a preview and isn't added to exported photos. The full version adds it on export.
Step by step
A 4:5 photo for social media with shooting details
- Click Frame in the editor's top bar
The Frame screen opens.
- Choose Frame, then click White bar under the styles.
- Choose 4:5 for the ratio
The photo isn't cropped; the margin grows instead.
- Choose the details to add
Check Camera · Lens · Aperture · Shutter.
- Click Done
It's saved to this photo, and the frame also shows in thumbnails and Full view.
- Create the file with Export
It's saved with the frame, exactly as shown.
Turning a portrait into a magazine cover
- In Full view, click Frame and choose Magazine cover.
- Choose a cover style
e.g. Fashion.
- Position the photo
Drag the preview so the face doesn't overlap the headlines, and zoom in with the wheel.
- Add the text
Type a Headline and a Subheading; leave the rest empty and sample text fills in.
- Turn on Bring the head in front of the masthead
The head slightly covers the masthead, so it looks like a real cover.
- Click Done.
Result

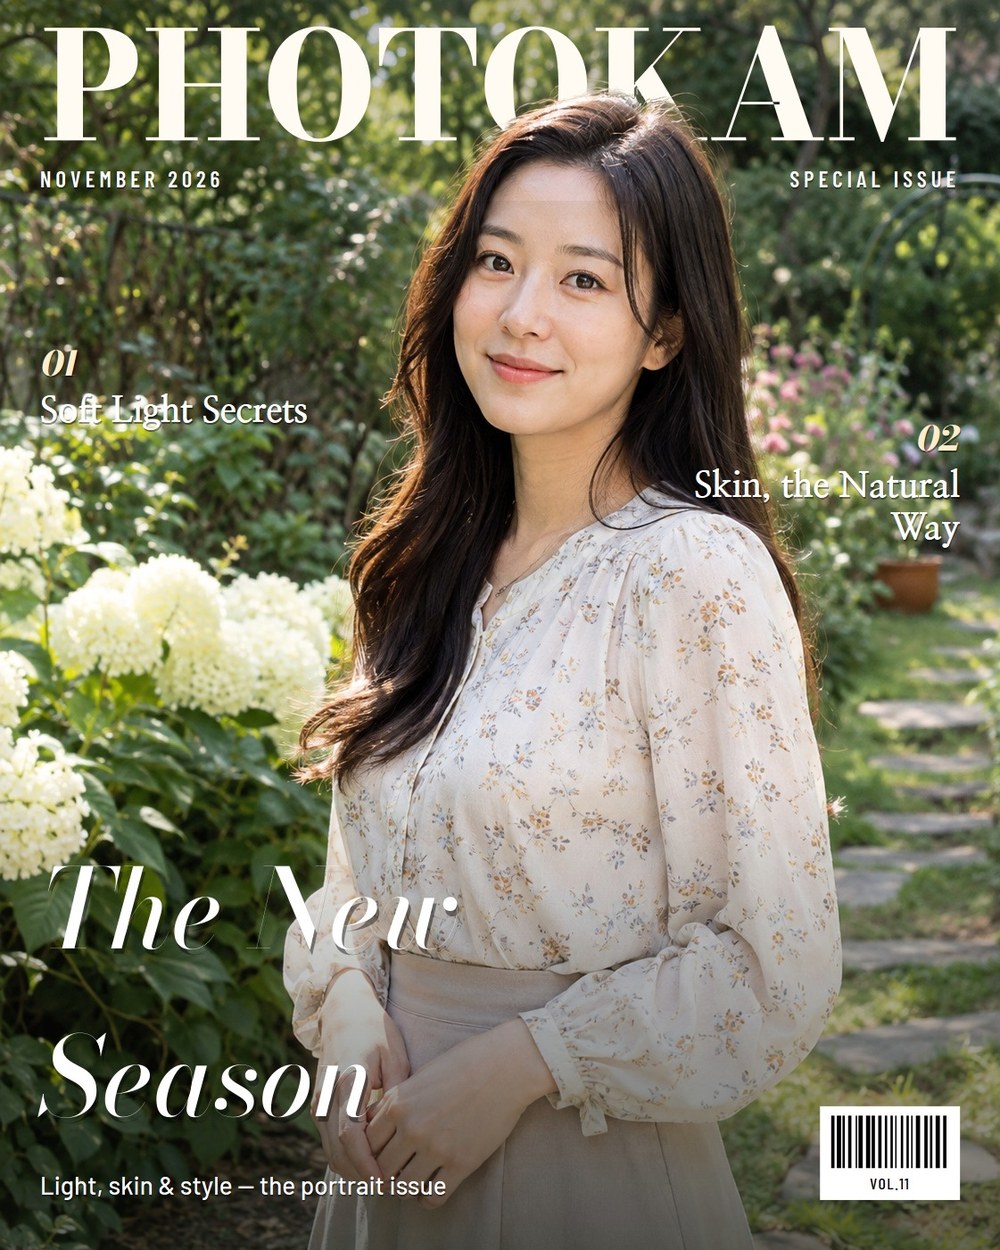
A decorated photo's output file gets bigger by the size of the decoration (e.g. a 4:5 frame adds margin, so the photo gets taller). To remove the decoration, choose None in the Frame screen and click Done.
Good to know
When you open the Frame screen again, the decoration saved with that photo appears as it was. Reopening the same photo also brings up the previews faster.
Covers look best on portrait-orientation photos where the person appears large. On photos without people, Bring the head in front of the masthead has no effect.
In the free version, edited photos get a faint diagonal mark that also covers the frame or cover. Unedited photos export without it (Free version · Full version).
Using a real magazine's name for the cover's Masthead means using someone else's trademark. Use the default PHOTOKAM or your own name.
Frequently asked questions
I can't see the frame in the editor.
To make editing easier, the editor shows only the photo. The Frame · cover badge at the top left tells you the photo is decorated, and the decoration appears in thumbnails, Full view and exported files.
I want to export just once without the frame.
Turn on Export without frame or cover in the Export window and save. The decoration saved with the photo stays as it is.
Can I add the same frame to several photos?
Decorate one photo, click Copy edits, then choose the Frame · cover group when you Paste onto other photos.
The shooting details are blank.
If the photo file doesn't contain that information, it can't be added. This often happens with files whose shooting details were removed, such as photos received through a messaging app.