Profile · Camera calibration
Choose what look a RAW photo starts from (Profile), and shift the red, green and blue primaries the camera recorded to change the color feel of the whole photo (Camera calibration). For RAW photos, you can also start from a look close to the camera's own JPG with JPG style in the top bar.
On this page
When to use itWhere to find itProfile (RAW photos)JPG style (top bar, RAW photos)Camera calibrationStep by stepResultGood to knowFrequently asked questionsRelated topicsWhen to use it
- When a RAW photo opens with colors that differ from what you saw on the camera screen, and you want to see it in the style you chose in the camera when shooting — Camera match or JPG style.
- When you want to start from a look with lower contrast and saturation to leave plenty of room for editing — Neutral.
- When you want a portrait to start soft, with less redness in the skin — Portrait.
- When you want to start with a rich landscape of deep skies and greens — Landscape.
- When skin tones look a little yellow or red, or you want to move the blue of the sky to a different blue — CALIBRATION.
Where to find it

At the very top of the Edit tab in the right panel of the editor. Below the histogram and the shortcut chips is the PROFILE panel (RAW photos only), below that the CALIBRATION panel (collapsed at first), and then the Light panel.
- ① Profile — Each image shows the current photo with that profile applied. Click one and the photo changes right away.
- ② Amount — Sets how strongly the chosen profile is applied.
- ③ CALIBRATION — Click the title to expand it (see "Camera calibration" below).
Profile (RAW photos)
| No. | Name | What it does |
|---|---|---|
| ① | Default | How photoKam Radar first opens a RAW photo. This profile is selected at first. |
| ① | Camera match | Matches the colors of the camera JPG inside the RAW. The style you chose in the camera when shooting comes through as it is. |
| ① | Neutral | Starts with lower contrast and saturation. Leaves more room to edit. |
| ① | Portrait | Starts softer, with less redness in skin. |
| ① | Landscape | Starts with richer skies and greens and a little more contrast. |
| ① | Monochrome | Starts in black and white. |
| ② | Amount | 0 – 100, default 100. Available when you choose a profile other than Default. The lower it is, the closer the look gets to Default. |
- Hover over an image to see a description of that profile.
- A profile is the starting point for your other edits. After choosing a profile, you can keep adjusting light, color, curves and so on as usual.
- Changes to Amount made in one drag are grouped into a single undo step.
- The PROFILE panel doesn't appear for JPG · PNG photos.
JPG style (top bar, RAW photos)
If a RAW photo contains a JPG preview made by the camera, a JPG style button appears next to Auto in the top bar.

- Click ② JPG style and the slider values for brightness, color and smoothness (noise reduction · sharpening) are set so the photo looks like the camera JPG inside the RAW. The RAW's wider tonal range is kept.
- The changed values show up as they are on the sliders in each panel, so you can refine them further from there.
- While it's applied, the button looks switched on; click it again to go back to how it was before.
Camera calibration
Shifts the red, green and blue primaries the camera recorded to change the color feel of the whole photo. Unlike the Color Mixer, which changes one color at a time, moving a primary changes every color that contains it, all together and naturally. Use it to refine skin and sky tones.
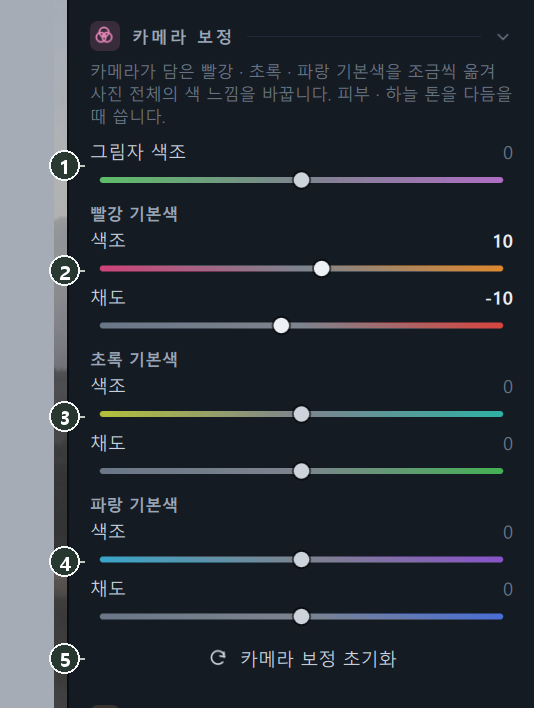
| No. | Name | Range | Default | What it does |
|---|---|---|---|---|
| ① | Shadows tint | −100 – 100 | 0 | Moves the color of dark areas toward green (−) or magenta (+). Corrects shade that looks greenish or purplish. |
| ② | Red primary — Hue · Saturation | −100 – 100 | 0 | Moves the red primary toward magenta (−) or orange (+), and lowers or raises its intensity. Has the biggest effect on skin tones. |
| ③ | Green primary — Hue · Saturation | −100 – 100 | 0 | Moves the green primary toward yellow (−) or teal (+), and changes its intensity. Changes the feel of leaves and grass. |
| ④ | Blue primary — Hue · Saturation | −100 – 100 | 0 | Moves the blue primary toward teal (−) or purple (+), and changes its intensity. Changes the feel of the sky and the sea. |
| ⑤ | Reset calibration | Click | — | Sets all 7 calibration sliders back to 0. Available once you change any of them. |
- The colors at both ends of a slider are the colors it shifts toward in that direction.
- Camera calibration works on both RAW and JPG photos.
- For photos edited the older way, the panel shows "Not available for this photo because it was edited with the older engine. Click "Reset all" to switch to the new engine." and the sliders are dimmed. Clicking Reset all in the top bar makes it available, but it also removes the photo's other edits.
Step by step
Starting a RAW from the colors you saw on the camera
- Open a RAW photo in the editor
The PROFILE panel appears at the top of the Edit tab.
- Click Camera match
The colors match the color style you chose in the camera when shooting.
- If it's too strong, lower Amount
At around 70, it's about halfway mixed with Default.
- Keep editing
Refine as usual, starting from the Light panel.
Making skin tones a little clearer
- Click the CALIBRATION title to expand it.
- Raise the Hue of Red primary to around +10
Reddish skin becomes a little clearer, toward orange.
- Lower the Saturation of Red primary to around −10
Flushing stands out less.
- Check with Compare original or Split view
If you don't like it, click Reset calibration.
Result
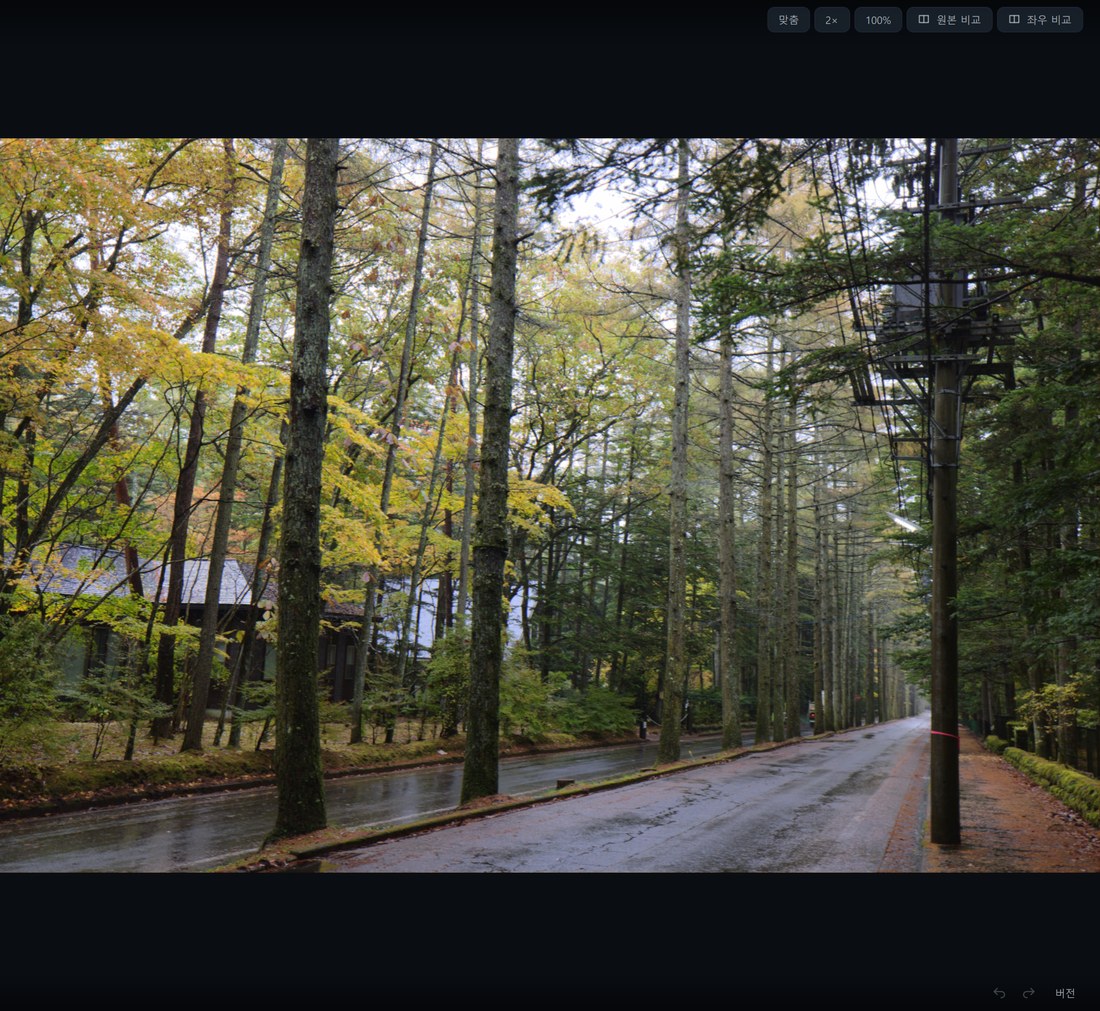
 BeforeAfter
Even the same RAW photo starts with different colors and contrast depending on the profile. Changing the profile leaves your other edits, such as light, color and curves, as they are.
Good to know
The brightness, skin redness and sharpness a RAW photo opens with are set in the RAW photos section of Settings. The settings are the starting point for every RAW photo; the profile is chosen per photo.
If you choose the Color group in Copy edits · Paste, the profile and camera calibration are copied too (Editor overview).
The profile images are made from the current photo while the panel is expanded. For large RAW photos, it can take a moment for all the images to appear.
Frequently asked questions
I can't see the PROFILE panel.
It appears only for RAW photos. For JPG · PNG photos, start editing right from the Light panel.
I can't see the JPG style button.
It appears only for RAW photos that contain a camera JPG preview.
What's the difference between Camera match and JPG style?
Camera match matches the colors of the profile (the starting point) to the camera JPG, while JPG style sets brightness, color and smoothness as slider values. You can change the values JPG style sets right on the sliders.