Editor overview
This is where you adjust a photo's brightness · color · texture. Your original file is never changed — only the edits are saved separately, and a result file is created anew with Export. This page covers the screen layout and the features common to all panels (Auto · undo · compare · versions · copying and pasting edits · the filmstrip).
On this page
Watch the videoWhen to use itHow to open itThe screen at a glance① Top bar② View buttons · ④ UndoAuto⑤ The Edit tab of the right panelCopying · pasting editsVersions — saving edits with a nameCanceling and leavingStep by step — the basic flowKeyboard shortcutsGood to knowFrequently asked questionsRelated topicsWhen to use it
- When you want to make a photo look good in one step (Auto) and then fine-tune only where needed.
- When you want to compare the result side by side with the photo before editing.
- When you want to apply the edits you made to one photo to several photos at once.
How to open it
- In the Full view, click Edit at the top right (Edited for photos you've already edited).
- Formats you can edit: JPG · PNG · RAW (CR2 · CR3 · ARW · NEF · DNG and more). Other formats open in the external editor.
The screen at a glance
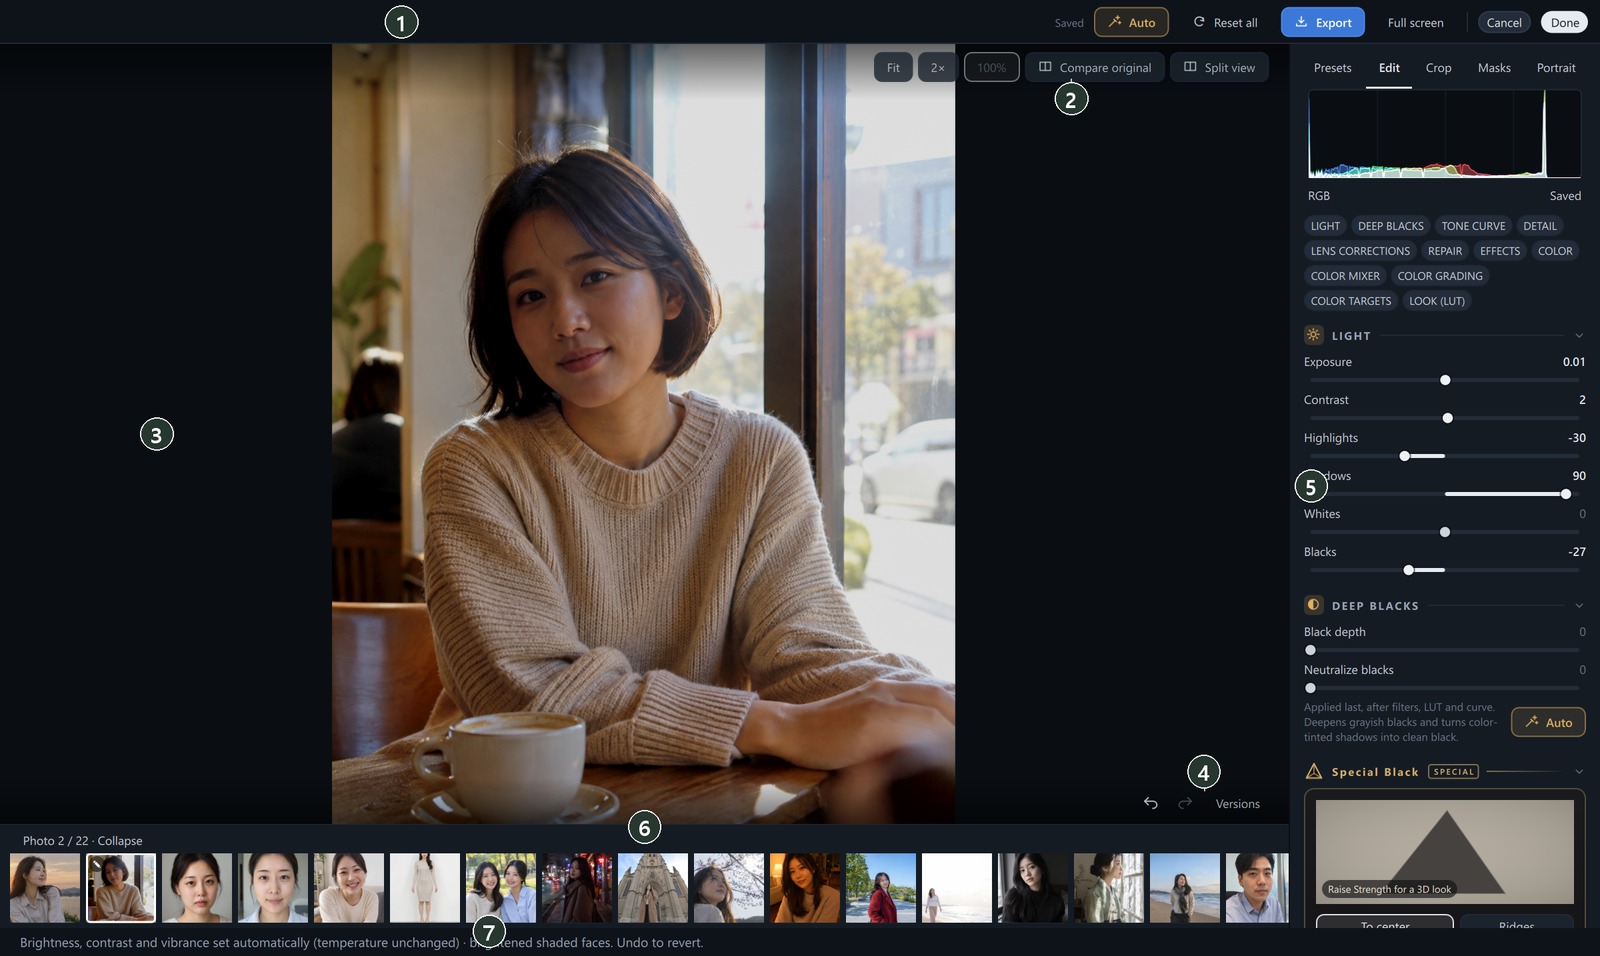
| No. | Name | What it does |
|---|---|---|
| ① | Top bar | Auto · JPG style · watermark · reset all · frame · Showcase · export · full screen · cancel · done |
| ② | View buttons | Fit · 2× · 100% · compare original · split view |
| ③ | Photo | Shows the edited result right away. Zoom with the wheel, and drag to move around once zoomed in. At fit size, drag left or right for the previous · next photo |
| ④ | Undo · versions | Undo · redo · edit versions |
| ⑤ | Right panel | Presets · Edit · Crop · Masks · Portrait tabs |
| ⑥ | Filmstrip | Move to other photos in the same list · select several photos to paste edits |
| ⑦ | Status line | The result of what you just did (values changed by Auto · paste · export finished and so on) |
① Top bar

- ① Save status — Waiting to save… → Saving… → Saved. When you change a value, it's saved automatically a moment later (there's no separate save button).
- ② Auto — sets brightness · contrast · color automatically (see "Auto" below).
- ③ JPG style — shown only for RAW photos. Sets brightness · color · smoothness so the photo looks like the JPG the camera made (Profile · Camera calibration).
- ④ Watermark — sets your own logo or text to add on export (Frames · Magazine covers · Watermarks).
- ⑤ Reset all — clears every edit, including crop (can be undone).
- ⑥ Frame — adds a frame with camera details or a magazine cover (Frames · Magazine covers · Watermarks).
- ⑦ Showcase — shares the edited photo to the photoKam Showcase gallery (Sharing to Showcase).
- ⑧ Export — creates a new file that looks the way you edited it (Export).
- ⑨ Full screen (F11).
- ⑩ Cancel — discards the changes made this time and closes (see "Canceling and leaving" below).
- ⑪ Done — saves and returns to the full view (Esc).
② View buttons · ④ Undo

- ① Fit — shows the whole photo · ② 2× — twice the fit size (centered on the middle of the area you're viewing).
- ③ 100% — one photo pixel = one screen pixel. Sharpening · noise only look exactly like the exported file at this zoom.
- ④ Compare original — while it's on, shows the whole original before cropping (\; ₩ on a Korean keyboard).
- ⑤ Split view — drag the center line to compare before on the left · after on the right (Y).
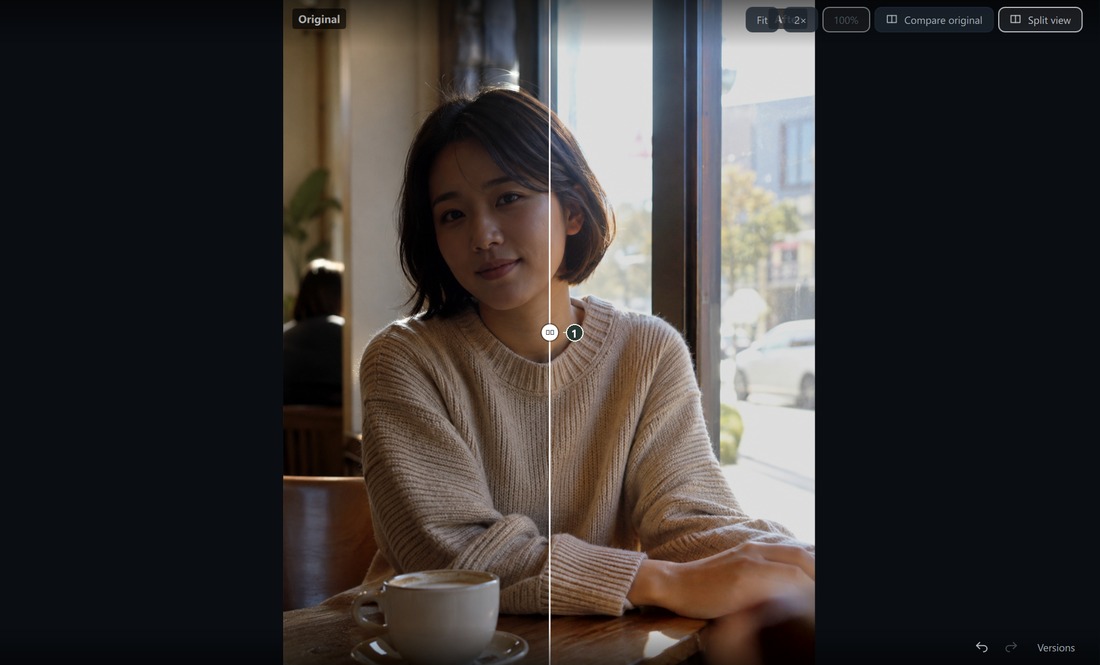
- The mouse wheel zooms up to 1600% of the original pixels. Above 300%, pixels are shown as they are, without blurring.
- At fit size, drag the photo left or right to go to the previous · next photo. The filmstrip below follows to the current photo too.
The undo buttons are at the bottom right of the photo.
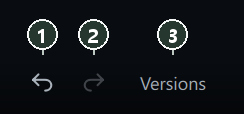
- ① Undo (Ctrl+Z) · ② Redo (Ctrl+Shift+Z) · ③ Versions (see "Versions" below).
- Values changed during a single drag are grouped into one undo step. You can undo up to 100 times for a photo, and the history starts over when you reopen the photo.
Auto
Click Auto in the top bar once and the photo is analyzed to set exposure · contrast · highlights/shadows · whites/blacks · vibrance. Photos shot too dark are brightened more boldly. If there are people, shaded faces are brightened and skin is kept from turning too red. Temperature is left as it is.
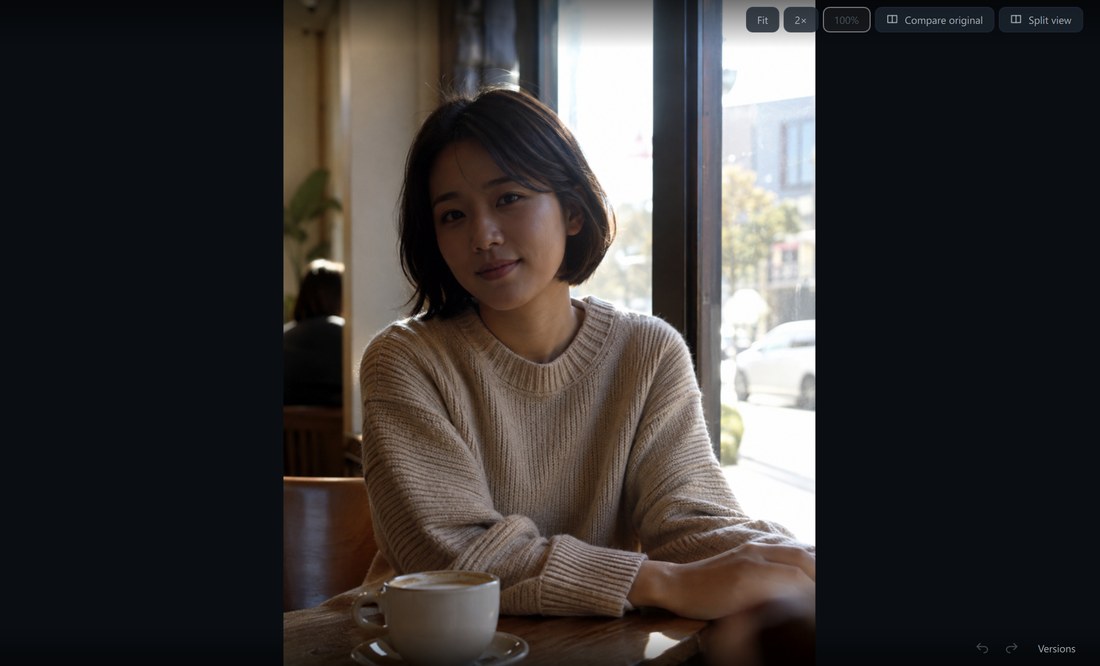
 BeforeAfter
What was changed is shown in the status line at the bottom.

- If you don't like it, press Ctrl+Z once or click Auto again to go back to how it was before Auto.
- Auto doesn't add to the current values; it analyzes the original and sets the values anew. If you click Auto after a preset, the preset's brightness · contrast values change, while color work such as temperature · curves · grading · LUTs stays.
- Mood photos shot dark on purpose are brightened less. To fix colors, use Auto color in Color.
⑤ The Edit tab of the right panel
At the top is the histogram, below it shortcut chips for the panels (click one to jump to that panel), and then the panels in order. Click a panel title to collapse or expand it.
| Panel | Guide page |
|---|---|
| Profile (RAW photos) · Camera calibration | Profile · Camera calibration |
| Light | Light |
| Deep Blacks · Special Black | Deep Blacks · Special Black |
| Tone Curve | Tone Curve |
| Detail | Detail |
| Lens Corrections | Lens Corrections |
| Repair · Effects | Repair · Effects |
| Color · Color Mixer · Color Grading · Color Targets · Look (LUT) | Color |
Working with sliders (common to all panels)
- Drag the handle or click the slider. Dragging the name left or right also changes the value (hold Shift for 10× finer control).
- Double-click to return to the default (0 in most cases).
- Click the number box to type a new number right away (Enter applies · Esc cancels).
- Non-zero values are shown with a bold number and a filled slider, so you can spot them at a glance.
At the very bottom of the panel are these buttons.
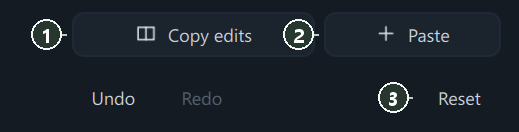
- ① Copy edits (Ctrl+Shift+C) · ② Paste (Ctrl+Shift+V) — see "Copying · pasting edits" below.
- ③ Reset — clears everything except crop · rotation · perspective · lens corrections. To clear crop as well, use Reset all in the top bar.
Copying · pasting edits
One photo at a time
- In the photo you've finished editing, click ① Copy edits.
- Click another photo in the filmstrip and click ② Paste.
- In the window, choose which groups to bring over and click Paste (the same window as in the picture below).
Several photos at once
- In the source photo, click Copy edits.
- In the filmstrip at the bottom, Ctrl+click the photos to paste to (marked with ✓). "N selected" and Paste edits to selected appear above the filmstrip.

- Click Paste edits to selected to open the window. Choose which groups to bring over and click Paste.
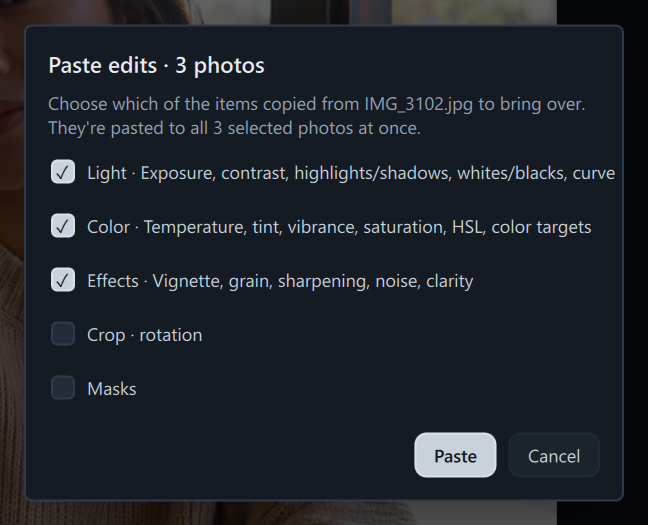
- Light · color · effects are checked from the start. Crop · rotation · masks are off because they can land in the wrong place if the aspect ratios differ.
- The color group also includes the RAW profile and camera calibration. If you choose Frame · cover, the decoration is pasted too (Frames · Magazine covers · Watermarks).
- Lens corrections · perspective · repair · portrait retouching · LUTs are set per photo, so they aren't carried over.
- Pasting to several photos can't be undone. To revert, open that photo and click Reset.
Versions — saving edits with a name
- Click ③ Versions and Edit versions opens on the right.
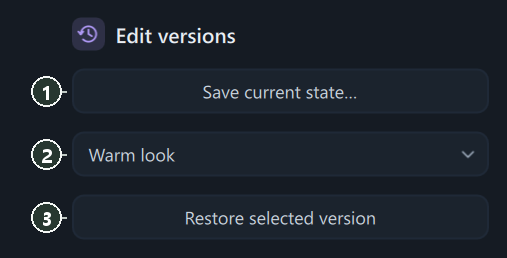
- ① Save current state… → enter a name and click Save.

- Try out various changes.
- To go back, choose a version in ② and click ③ Restore selected version. Restoring can also be undone with Ctrl+Z.
- To return to the editing panels, click the Edit tab at the top of the right panel.
Canceling and leaving
If you click Cancel in the top bar and there are changes, the window below appears. Discard & close discards the changes made since you opened it this time, and Keep editing takes you back. Saved versions and exported files are kept.

Cancel applies only to the photo you're viewing now. Other photos you edited while moving through the filmstrip were already saved when you moved on.
Step by step — the basic flow
Keyboard shortcuts
| Key | Action |
|---|---|
| Ctrl+Z · Ctrl+Shift+Z | Undo · redo |
| Ctrl+Shift+C · Ctrl+Shift+V | Copy edits · paste |
| Ctrl+→ · Ctrl+← (or PgDn · PgUp) | Next · previous photo |
| Y · \ | Split view · compare original |
| F11 | Full screen |
| Esc | Turns off active tools one at a time; if none are on, Done |
| Mouse wheel | Zoom in · out, centered on the mouse pointer |
| Drag left or right at fit size | Previous · next photo |
On macOS, press ⌘ (Command) instead of Ctrl.
Good to know
Your original stays as it is. Result files are created only with Export.
Rotate 90° in the gallery · full view is also an edit, so it shows in the editor as is, and you can change it again in the Crop tab (Crop · Rotate · Perspective).
While the photo takes time to redraw, a light green progress bar and Applying… appear at the bottom left of the photo. They also appear in the same spot while the full-resolution original is being read when you're zoomed in.
Features with a sparkling AI badge on the panel title or shortcut chip (Auto select in masks, the Portrait tab, AI denoise) recognize the people · body parts in a photo.
In the free version, a faint watermark appears over edited photos in the editor and on exported photos (the images in this guide show the full version). Unedited photos export without a watermark (Free version · Full version).
Frequently asked questions
There's no save button.
When you change a value, it's saved automatically a moment later. Check for Saved in the top bar.
What's the difference between Done and Cancel?
Done saves and closes; Cancel discards the changes made this time and closes.
Shortcuts don't work.
Shortcuts don't work while the cursor is in a number box. Click the photo once or press Enter to finish typing.
How do I edit TIFF · HEIC?
This screen supports only JPG · PNG · RAW. Other formats open in the external editor set in Settings.