Full view
Double-click a photo to view it large, filling the screen. Zoom in up to 1600% of the original pixels with the wheel, check blown-out highlights · the focus point, and move through the photos in the same folder with the filmstrip at the bottom. Slideshows and editing start here too.
On this page
Watch the videoWhen to use itHow to open itThe screen at a glanceTool buttonsZoomingChecking blown-out areasInspector panelRight-click menuSlideshowFocus pointRAW and JPGView 360° photos and videosKeyboard shortcutsGood to knowFrequently asked questionsRelated topicsWhen to use it
- When you zoom in to choose the photo that's in focus among similar shots.
- When you check blown-out areas such as a sky or white clothes.
- When you want to see shooting information · the histogram · the location together with the photo.
- When you want to watch a folder's photos as a slideshow with music · or edit right away.
How to open it
- Double-click a photo in the gallery (or select it and press Enter).
- Click the preview in Details, or choose Open full view in the right-click menu.
- Click a blue dot (a single photo) on the map.
The screen at a glance
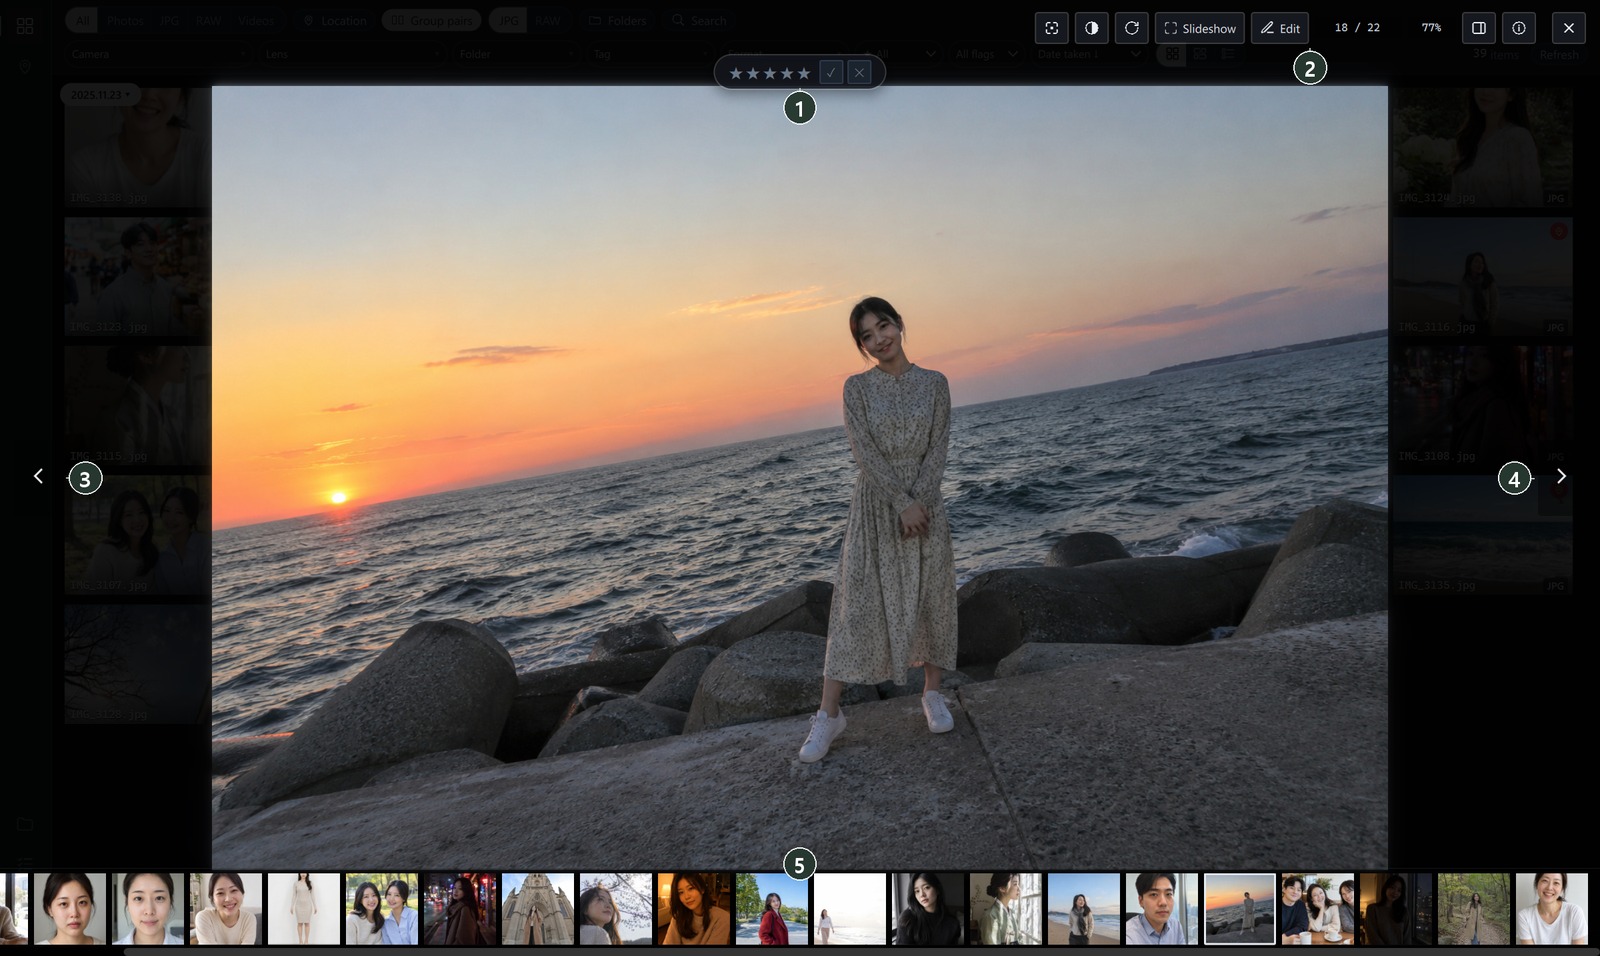
- ① Rating · pick · reject — saved as soon as you click (1–5 · P · X).
- ② Tools (see "Tool buttons" below).
- ③ ④ Previous · next photo (← · →). Dimmed at the first · last photo.
- ⑤ Filmstrip — the photos in the same folder as this one. Click one to go to it; scroll sideways with the wheel.
To close, click ✕ at the top right or press Esc. Clicking outside the photo doesn't close it (so you don't close it by accident).
Tool buttons

- ① Focus point (F) — shows where the camera focused as a rectangle (see "Focus point" below).
- ② Clipping warning — covers blown-out areas with stripes. At 0.05% or more, the percentage appears on the button.
- ③ Rotate 90° — the original stays as it is; saved as an edit (Viewing and selecting photos).
- ④ Slideshow (S) — see "Slideshow" below.
- ⑤ Edit — goes to the editor (Editor). Shows Edited for photos you've already edited. For a video, Edit in this spot opens the video editing screen (Video editing, Windows version).
- ⑥ Frame — opens the screen for choosing a frame · magazine cover (photos only). If the photo is already decorated, it looks switched on (Frames · Magazine covers · Watermarks).
- ⑦ Which photo this is in the folder · ⑧ the zoom relative to the original (100% = one photo pixel per screen pixel).
- ⑨ Inspector panel (Tab · H) · ⑩ quick info (I, while the panel is off) · ⑪ close (Esc).
For RAW photos, a View: RAW original / View: Camera preview button also appears on the left, and if there's a RAW+JPG pair of the same shot, a Show JPG file / Show RAW file button appears too (see "RAW and JPG" below).
Zooming
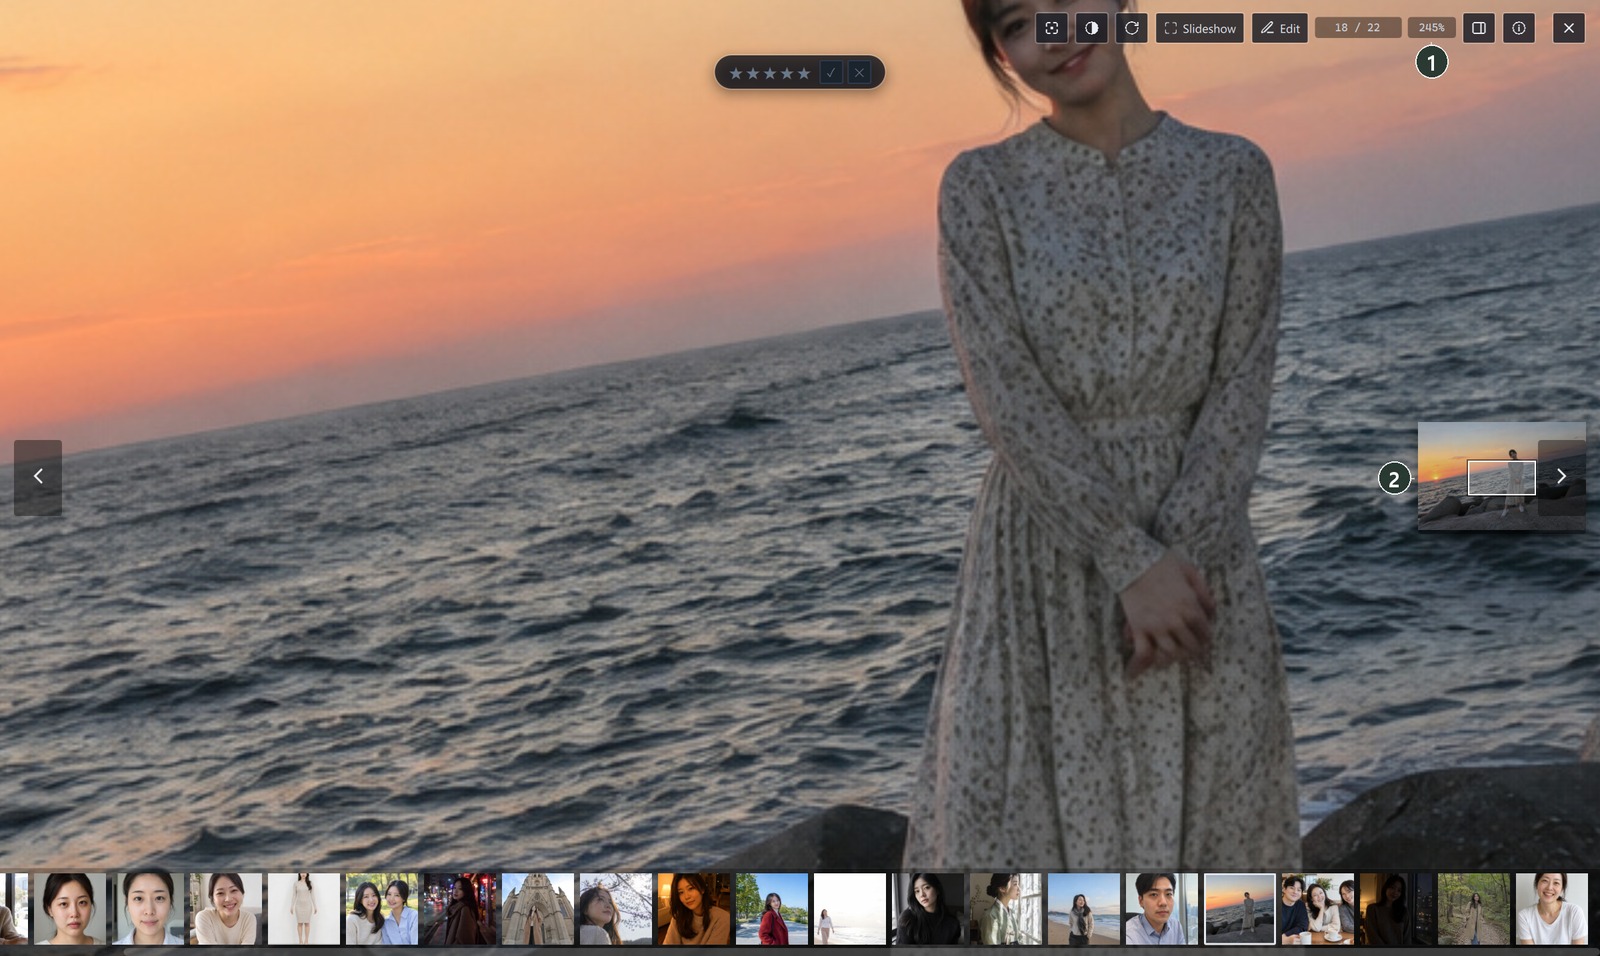
- Wheel — zooms in and out, centered on the mouse pointer. You can zoom up to 1600% of the original pixels (one photo pixel = 16 screen pixels). Above 300%, pixels are shown as they are, without blurring.
- Double-click — fit ↔ 2.5×.
- Drag — moves the photo while zoomed in. Dragging at fit size sends the file out (drop it into File Explorer · a messenger window to copy it).
When you zoom in, ① the zoom changes and ② a minimap appears at the middle right. Click or drag the white rectangle in the minimap to move the area you're viewing.
Checking blown-out areas
Click ① the clipping warning and areas that reach the brightest value are covered with stripes, and the button shows their percentage. It stays on for the next photos until you turn it off.
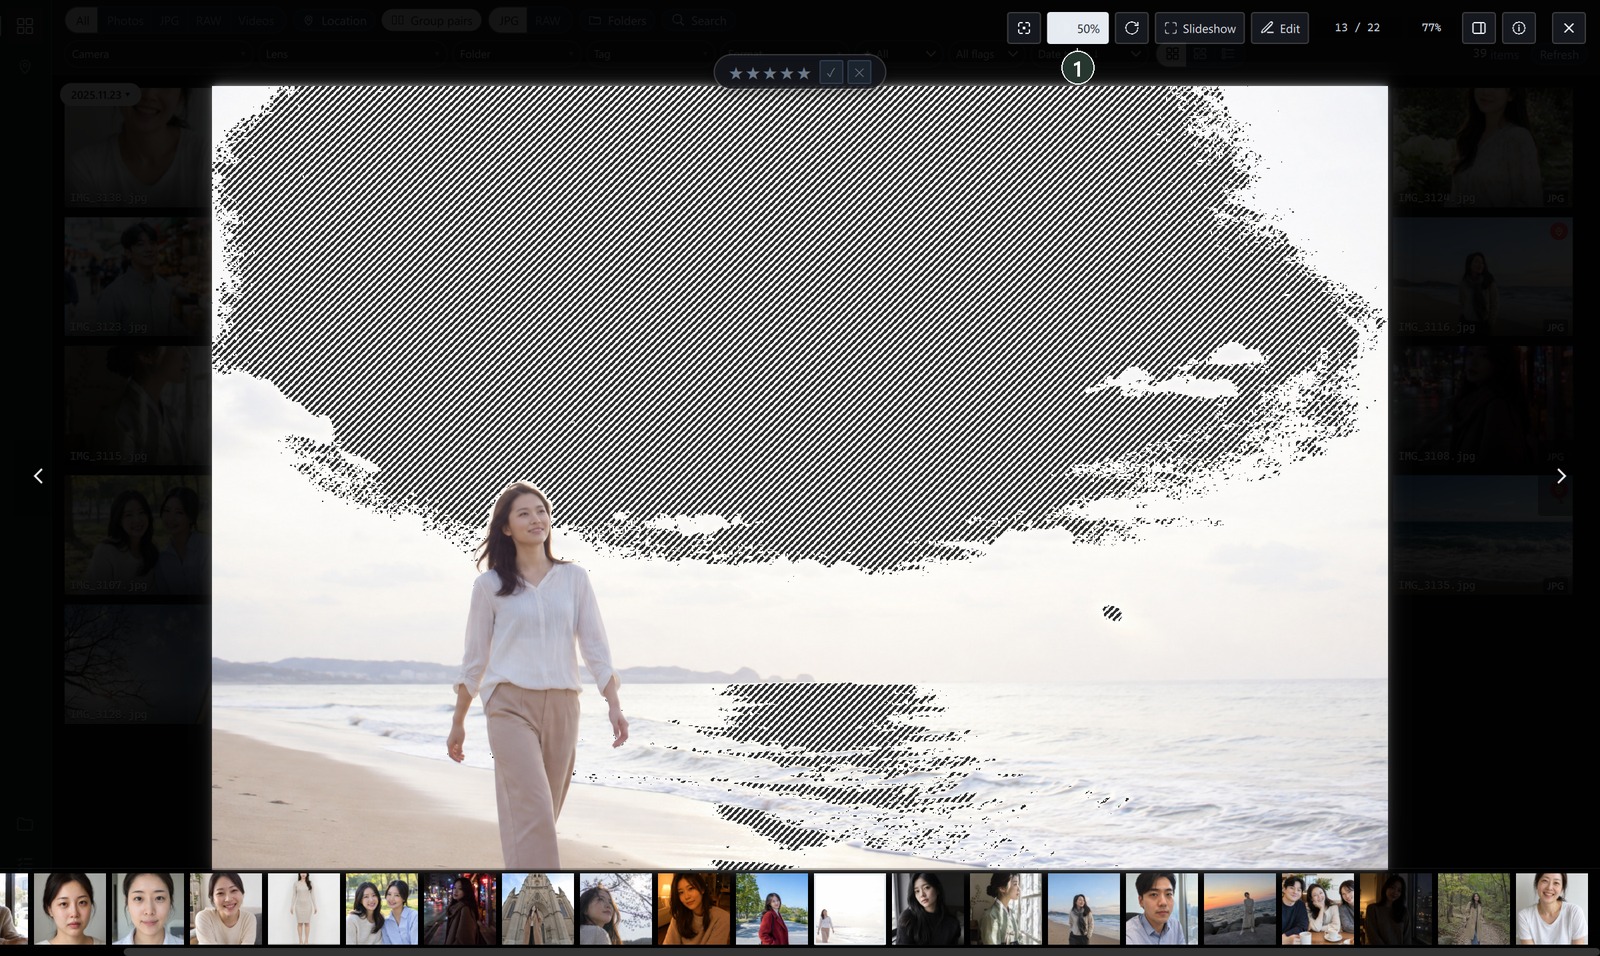
You can try to recover blown-out areas by lowering Highlights · Whites in the editor (Light).
Inspector panel
Click ⑧ (or press Tab) and a panel docks on the right. Whether it's on is remembered for next time.

- ① Histogram — RGB · Luminance. If values pile up at either end, a white triangle appears in the corner (crushed shadows · blown-out highlights).
- ② Information — file · capture · camera · exposure · location · storage (path · dates). Only rows that have values.
- ③ Map — only when there's location data. Expand opens the map window (Jump to date · Map).
- ④ Rating · flag.
With the panel off, press I to show the same information at the top right of the photo.
Right-click menu
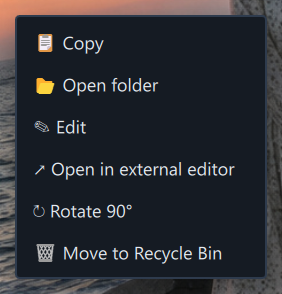
Copy (paste in File Explorer to copy the file) · Open folder · Edit · Open in external editor · Rotate 90° · Move to Recycle Bin (asks once, then moves on to the next photo).
Slideshow
Click ④ Slideshow (S) to show the filmstrip's photos full screen, starting from the current photo. When it reaches the end it starts over, and videos are skipped.


Control bar (from the left): previous · ① play/pause (Space) · next · position · track name (click for the track list) · next track · music on/off · volume · ② settings · end (Esc). It hides when you don't move the mouse for 2.5 seconds. Click the photo to switch between pause and play.
Click ② settings to open the window below. The slides keep advancing while it's open, so you can see the effect you pick right away, and your choices are saved.
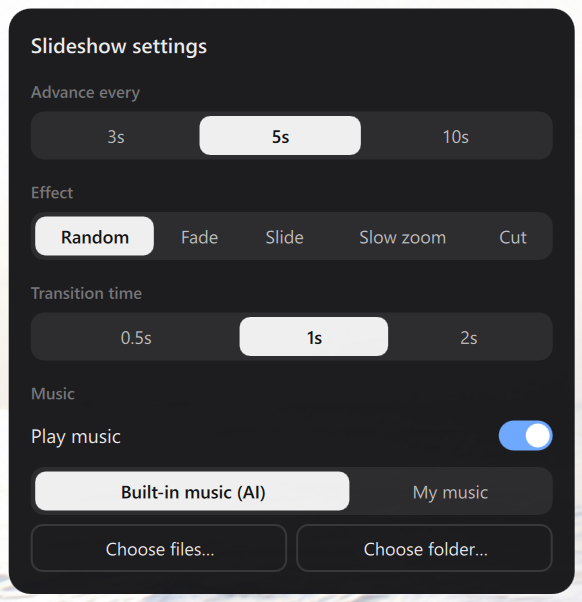
| Item | Choices | Default |
|---|---|---|
| Advance every | 3 s · 5 s · 10 s | 5 s |
| Effect | Random · Fade · Slide · Slow zoom · Cut | Random |
| Transition time | 0.5 s · 1 s · 2 s | 1 s |
| Play music | On · off | On |
| Music | Built-in music (AI) · My music (Choose files… · Choose folder… — mp3 · m4a · wav · flac and more) | Built-in music |
Music fades in over 2 seconds when the slideshow starts and fades out when it ends.
Focus point
Turn on ① focus point (F) to see the focus data the camera recorded, drawn as rectangles on the photo.
- Yellow rectangle = the spot chosen for focusing, green rectangle = the spot recorded as in focus.
- Shown only for photos from cameras that record focus data, such as the Canon R series · newer Sony · Olympus · Panasonic. If there's no data, "No focus data in this photo" appears.
- Whether it's on is kept for the next photo · the next launch.
RAW and JPG
- In folders that mix RAW and other formats, All · RAW · JPG appear at the top left. Switching moves you to the other-format file with the same name as the shot you were viewing, and the filmstrip keeps only that type.
- If there's a RAW+JPG pair of the same shot, Show JPG file / Show RAW file appears among the tools so you can switch right away.
- For RAW photos you can choose View: RAW original (converts the original directly — looks the same as in the editor) / View: Camera preview (the small JPEG the camera stored — fast).
View 360° photos and videos
From Windows 1.0.336, you can look around exported 2:1 photos and MP4 files. Original camera files in .insv or .osv format are not supported.
- Open a supported file in the large viewer.
- Turn on 360°, then drag the photo or video to look around.
- Press the same button again to return to the flat view.
Keyboard shortcuts
| Where | Key | Action |
|---|---|---|
| Full view | ← · → · PgUp · PgDn | Previous · next photo |
| Full view | 1 – 5 · 0 / P · X · U | Rating / flag |
| Full view | F · Tab · H · I | Focus point · inspector panel · quick info |
| Full view | S · Delete · Ctrl+C · Esc | Slideshow · Recycle Bin · copy file · close |
| Slideshow | Space · ← · → | Pause · play · previous · next |
| Slideshow | N · P · Esc | Next track · previous track · end |
On macOS, press ⌘ (Command) instead of Ctrl.
Good to know
To check focus accurately, zoom in to around 100%.
When you first open a RAW, "Converting the RAW original…" and a progress bar appear briefly. For skimming quickly, View: Camera preview is faster.
The filmstrip shows photos in the same folder, regardless of the gallery's search conditions (up to 5,000 photos per folder).
Edit keeps the original as it is and saves only the edits. Open in external editor opens the original in another program. For TIFF · WEBP and similar files, clicking Edit opens them in the external editor.
In the free version, a faint watermark appears when you view edited photos in the full view · slideshow (Free version · Full version).
Photos with a frame or magazine cover also show their decorated look in the full view (Frames · Magazine covers · Watermarks).
The first time you open the full view after starting the app, Preparing the viewer… may appear briefly. From the second time on, it opens right away.
Frequently asked questions
The next photo isn't the next one in my search results.
The full view moves through photos within the same folder.
My RAW looks different from the camera screen.
Switch to View: Camera preview to see it exactly as the camera saved it. To start editing from the camera's colors, choose Camera match in Profile.
The slideshow button is dimmed.
There must be at least two photos in the same folder.
I want to turn off the slideshow music.
Turn it off with the speaker button on the control bar or Play music in the settings. It will start with music off next time too.